
1. Open CAD .eps file in Photoshop:
- You can do this by dragging and dropping the .eps file onto the Photoshop icon along your tool bar where all your programme icons are. The file will then automatically open in Photoshop.
- Once you have done this a little window will appear.
e.g.

Increase the resolution here from 72-300 dpi.
- It is important use a high resolution (min 300 dpi) as your images will be pixelated otherwise.
2. Preparing the CAD:
- You will see you will have 1 layer now (of your CAD) in your Layers menu.
e.g.

- You will need to duplicate this CAD layer. You can do this in the top drop down menu.
e.g.
- Repeat the above again so you have three CADS on different layers.
- The bottom layer will be an original image that can be hidden and saved for future reference and editing. Call this layer the Original.
(You can re-name layers by double clicking
on the writing on the layer)
- Name the next layer above that the Colour layer.
- Name the top layer Outline layer.
E.g. (So your layers window should look like this now)

3. Preparing the Outline Layer:
This layer you are going to make into just a black and
white outline of the CAD.
- Hide the Original and the Colour layers for now. You can do this by clicking the little eye icons.

- Now make sure you are working on the outline layer e.g this layer is highlighted blue.
E.g.

- Click on the little fx icon located at the bottom of the layers window.

- Click on the little fx icon located at the bottom of the layers window.

- A menu will then pop up and you need to select blending options.
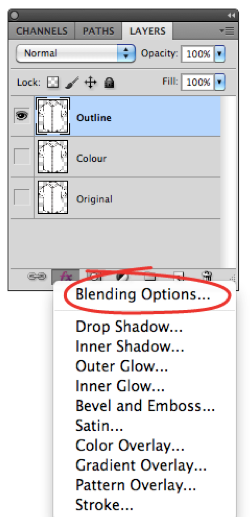
- Another window will then pop up (see below) called Layer Style. Select multiply from the little drop down menu at the centre top. Then adjust the top one of bottom two scales (moving the little triangle from right to left) until all the white and grey in the CAD has disappeared and you are left with its black outline.

- Now you can leave this layer and go on to layer called Colour Layer e.g. so the colour layer is highlighted blue. This is where you will do all your colouring in.
4. Colouring in the CAD on the Colour Layer:
- You can colour in block areas with the paint tool (found under gradient tool on the tools panel) by just clicking on the different areas.

(just click on the different sections of the CAD to colour in)
- You can change the colour you paint with by double clicking on the square at the bottom of your tools panel.

- A window will then pop up called Colour Picker. I then click on the button that says colour libraries, then a list of pantones comes up that I find a more accurate way of selecting a colour.

5. Filling in CADS with a pattern.
You can also fill in your CADs with a
pattern e.g. a check of print.
- Source pattern – (make sure it has a repeat!)
Here are a couple of examples of patterns
with good repeat prints.


- Drag and drop your chosen pattern straight onto your CAD. This will create it’s own layer. Drag and drop this layer so that it’s positioned ABOVE your outline layer (if it is not there already).

- Adjust the size of your pattern so that it suits the scale of your CAD.

- Use square marquee tool to select the pattern repeat (like in the above examples) The square marquee tool is located near the top of your tools panel.

- This will create a flashing dotted line around you selection.

- Once you are happy with your selection go to to:
Edit - Define Pattern… in your top drop down menu.
- A window will appear asking you to for a pattern name. Name your pattern as you like and click OK

- You can then hide your pattern on your layers window and save it for later.
- You can then go back to working on the colour layer again.

6. How to colour your CAD with the pattern you have defined:
- Select the paint tool.
- Change the little drop down menu at top tool bar from
foreground to pattern
E.g.

- The pattern you have just created will appear in the drop down swatch menu to the right of this drop down menu. Select the swatch you have created.
E.g.

- You can then fill in the CAD in the same way as you do with block colour using the paint tool.

At this stage if you think the pattern is to big, or you have defined it incorrectly, you can reveal the pattern layer and change the size and pattern area and re-define until you are happy with it.
7. Picking out colours in a pattern to use for garment details:
You can fill in garment details e.g. buttons, with colours
taken from your pattern so they match.
- Using the eyedropper tool, hover over your pattern and select your desired colour. Then fill in the desired area using the paint bucket tool in the same way you would with a flat colour.
(Make sure you select foreground again from the drop down menu otherwise the paint bucket will carry on filling with the pattern!)
E.g.

This helps to make all of the colours in your garment match nicely!
8. Rotating patterns for back neck buggys, shirt cuffs etc:
- Pull your pattern directly onto your CAD or if your using the same pattern as before reveal it again by clicking on the eye.
- Make sure your pattern this time is located in between your colour layer and outline layer and your outline layer at this point is hidden.

- Rotate the pattern to the desired angle (Hold down the shift button to do so at 45/90° intervals)
- Duplicate the pattern layer in case you want to use it on another part of the garment after. Then hide both of the pattern layers temporarily.
- Now go to the colour layer and select with the magic wand tool the area you want the angled pattern to fill. (A shirt sleeve or lining of a garment for example)
The magic wand tool is located near the top of your tools panel
E.g.

- The go to Select - Inverse from the top drop down menu.
Your selection should look something like this now:

- Now reveal one of the pattern layers and make sure you are working on that pattern layer e.g. the layer is highlighted blue.
(Your selection will stay selected regardless
of the layer you are working on)

- Then press the backspace/delete button and you will see the pattern is cropped into this area.

- You can then deselect your section and repeat the process for another area you want to fill in the same way.

- Once you finish adding patterns in this way to all your desired areas reveal the outline layer again so that you have crisp outlines once you are finished.
This technique is also a good way to add a pattern that does not have a repeat (e.g. a panel print) to a CAD like
on these two garments)

9. Adding tones and highlights to make your CAD look 3D:
- You can do this by using the dodge and burn tools. Located half way down your tools panel.

- Adjust the exposure and the range (shadows, tones & highlights) on top menu to amend intensity.

This gives the Garment a 3D feel.
10. Saving your file ready to import into another programme.
- Always save a PSD version of your CAD for future editing.
- Also save a Jpeg or PNG file (Which will be flattened and smaller in size), which can then be imported into Excel or InDesign.
Oh, wow..I need to study this for sure. You are a smart girl!!
ReplyDelete